To define an interface for your algorithm, it is essential to understand the structure and key components of the config.yaml file (aka spec file).
The config.yaml file specifies how the interface interacts with the algorithm and is located at: bilayers/src/bilayers/algorithms/algorithm_name/config.yaml.
Here, algorithm_name should accurately represent the task, such as cellpose_inference or cellpose_training.
Each config.yaml contains key sections that define how an algorithm integrates with an interface. These sections include: citations, docker_image, algorithm_folder_name, exec_function, inputs, outputs, parameters, and display_only. The skeleton structure can be copied from an existing example.
Once defined, the config.yaml is processed to generate an executable CLI command, where user-specified inputs are mapped to command-line arguments, facilitating algorithm execution and output retrieval.
Key Sections of config.yaml
citations: References relevant research citation, doi, and license associated with the algorithm.
docker_image: Defines the Docker image used for execution, including the organization, repository name, and tag.
algorithm_folder_name: Specifies the directory where the generated Gradio and Jupyter Notebook interface files are stored.
exec_function: Defines the function that converts the config.yaml (i.e. spec file) into a Gradio or Jupyter Notebook interface. It also includes the base command (e.g., python -m cellpose) that serves as the entry point for execution and a special
hidden_argssection if applicable.inputs: Refers to the elements that are translated into command-line arguments for our supported interfaces. Additionally, they contribute to adapting the Bilayers specification for integration with workflow management tools such as Snakemake, Nextflow, or WDL.
outputs: Primarily used for refining the Bilayers specification to be compatible with workflow management tools like Snakemake, Nextflow, or WDL. While they may or may not include a cli_tag, they are NOT involved in generating our interfaces.
parameters: Defines arguments that contribute to CLI command construction. Each parameter under this section either takes user-specified values or defaults when not explicitly provided.
display_only: Contains fields that are displayed on the interface but do not affect CLI execution. These objects must not include a cli_tag.
citations:
  - name: ""
    doi: ""
    license: ""
    description: ""

docker_image:
  org:
  name:
  tag:
  platform:

algorithm_folder_name:

exec_function:
  name: "generate_cli_command"
  cli_command:
  hidden_args:
    # - cli_tag:
    #   value:
    #   cli_order:

inputs:

outputs:

parameters:

display_only:
Before you start working on the config.yaml file, we recommend reviewing the command-line usage of the specific algorithm you’re building an interface for. This will help you determine what should go in inputs, outputs, parameters, display_only, and exec_function’s hidden_args.
Understanding cli_command
The cli_command is the starting point for executing the command line, like python -m cellpose, which is then followed by appending parameters and their arguments. We will cover more about cli_command in the context of the exec_function, but for now, it’s important to understand its role.
Defining citations
Citations are used to credit the relevant works associated with the algorithm. Include the correct name, doi, license and description of the algorithm. Guidelines on how to find citations can be found here.
citations:
  - name: "cite-1"
    doi: ""
    license: ""
    description: ""
  - name: "cite-2"
    doi: ""
    license: ""
description: ""Sample Example:
citations:
  - name: "Cellpose"
    doi: 10.1038/s41592-020-01018-x
    license: "BSD 3-Clause"
description: "Deep Learning algorithm for cell segmentation in microscopy images"Defining docker_image
Each interface’s Docker image is built on top of the base Docker image specific to the algorithm. Therefore, it’s highly recommended to choose an algorithm with a pre-built Docker image available on DockerHub.
For guidance on selecting a compatible base image, refer Choosing the Right Base Docker Image
To define the container image, select one from DockerHub by specifying its full reference. The image identifier follows a structured format, which can be deconstructed as follows:
For instance, cellprofiler/runcellpose_no_pretrained:0.1 consists of four components:
Organization/Namespace
(org): The segment preceding/, represents the DockerHub username or organization (e.g.,cellprofiler).Repository Name
(name): The section between/and:specifies the image repository (e.g.,runcellpose_no_pretrained).Tag
(tag): The portion after:, indicates the image version or a specific label such aslatest(e.g.,0.1).Platform
(platform): The architecture or operating system on which the base Docker image was built. Platform details can be found in the image metadata on DockerHub.
To learn more about docker image naming, refer to What are Docker tags?
Also, here’s the template to directly paste in your config.yaml file
docker_image:
  org:
  name:
  tag:
  platform:
Defining algorithm_folder_name
This specifies the folder where the generated Gradio and Jupyter Notebook interface files will be stored. The folder name should follow the convention of the config.yaml’s parent folder, such as algorithm_inference or algorithm_training.
Example: algorithm_folder_name: “cellpose_inference”
Defining exec_function
exec_function is instrumental in converting the yaml file to desired interface. It defines the specific function responsible for this conversion. The exec_function consists of the following components: name, cli_command, and hidden_args.
Below is the template to attach directly to your configuration file, followed by a breakdown:
exec_function:
  name: "generate_cli_command"
  cli_command: ""
  hidden_args:
    # dummy example
    # - cli_tag: "--save_png"
    #   value: "True"
    #   append_value: False
    #   cli_order: 3
Below is an example to follow, along with a breakdown of each component:
exec_function:
  name: "generate_cli_command"
  cli_command: "python -m cellpose --verbose"
  hidden_args:
    - cli_tag: "--save_png"
      value: "True"
      append_value: False
      cli_order: 3
name: This is the name of the function that converts the
yamlfile into the interface dynamically. It remains the same for all algorithms, so no changes are needed. name: “generate_cli_command”cli_command: As mentioned earlier, the cli_command refers to the
module executionin the documentation. This serves as the starting point, and the cli_tag and argument pairs are appended to it. Refer to the documentation for proper configuration.
In command-line systems, there are several common command line patterns used for constructing a cli_command. Here, we support several widely used patterns: Explore the full discussion here
someexecutable --unordered_flag_1 unordered_value_1 --unordered_flag_2 unordered_value_2
someexecutable unordered_value_1 unordered_value_2
someexecutable ordered_value_1 unordered_value_2
someexecutable --ordered_flag_1 ordered_value_1 unordered_value_2
someexecutable ordered_value_1 --unordered_flag_2 unordered_value_2
someexecutable --unordered_flag_1=unordered_value_1 --unordered_flag_2 unordered_value_2
someexecutable --ordered_flag_1=ordered_value_1 unordered_value_2
What are ordered_flag and unordered_flag?
In some cases, cli_command requires flags in fixed positions (e.g., always the 1st or last argument). To handle this, we use the cli_order flag. Here’s how it works:
Specify a positive number (1 to n) in cli_order to fix the position of the cli_flag and argument pair.
If cli_order is set to 0 or not specified, it will be treated as an unordered_flag, and all such flags will appear after ordered ones.
Negative numbers in cli_order will place the flag in the last position, after all unordered flags.
How to specify --flag_1=value_1?
By default, flags and their arguments are appended with a space between them. If you want to use = between the flag and value, simply add an = at the end of cli_tag. For example, cli_tag: “--savedir=” default: “/bilayers/my_outputs” This will generate: someexecutable --savedir=/bilayers/my_outputs
hidden_args: Need of hidden_args?
Sometimes, certain cli_tag and argument values should always be included in the cli_command, but you don’t want to expose them in the user interface. In these cases, use hidden_args.
Where can it be used?
A potential use case for hidden_args is ensuring output files are saved to a specific folder without allowing the user to modify it. If the algorithm’s command-line usage includes a specific cli_tag for this, you can define it as a hidden_arg. Use the following fields to configure hidden_args:
cli_tag: The command-line tag to be used.value: The fixed value for the tag.append_value: (Optional) Used for checkbox type to specify whether the value should be appended with the cli_tag.cli_order: (Optional) Specifies the order in which this tag should appear in thecli_command. If not set, it will appear after all ordered tags but before any negatively indexed ones.
Organizing Parameters from the Algorithm’s Command-Line Usage
inputs: If parameter is about providing any input files eg. image, measurement files, numpy array files, executable files etc.
outputs: A way to show what are potential outputs that would spit out post segmenting. Those could be presented under the umbrella of various types of files. eg. image, measurement files, numpy array files, executable files or some other files.
parameters: If the parameter and its argument need to be passed in the command line, include them in
parameters.display_only: If you want to show some information to the user without appending it to the command line, include it in
display_only.
Defining inputs
name:
type:
label: ""
description: ""
cli_tag:
cli_order:
default:
optional: True
format:
folder_name:
file_count:
section_id: ""
mode: ""name: This should be a simple name, for self-identification purpose. Ideally matching the
cli_tag(without hyphens). Use underscores instead of spaces. Example:name: use_gpu.
type: This defines the
typeof theinputsandoutputs. Its an umbrella of typefiles. So, ideally, it’s categorized in 5types of files. Those areimage,measurement,array,file,executable.The
typefield ininputsandoutputsdefines the category of data handled by the algorithm. This selection determines how the data will be structured, processed, and passed to the CLI command. Below is a visual representation of how to choose atypeand the associated properties: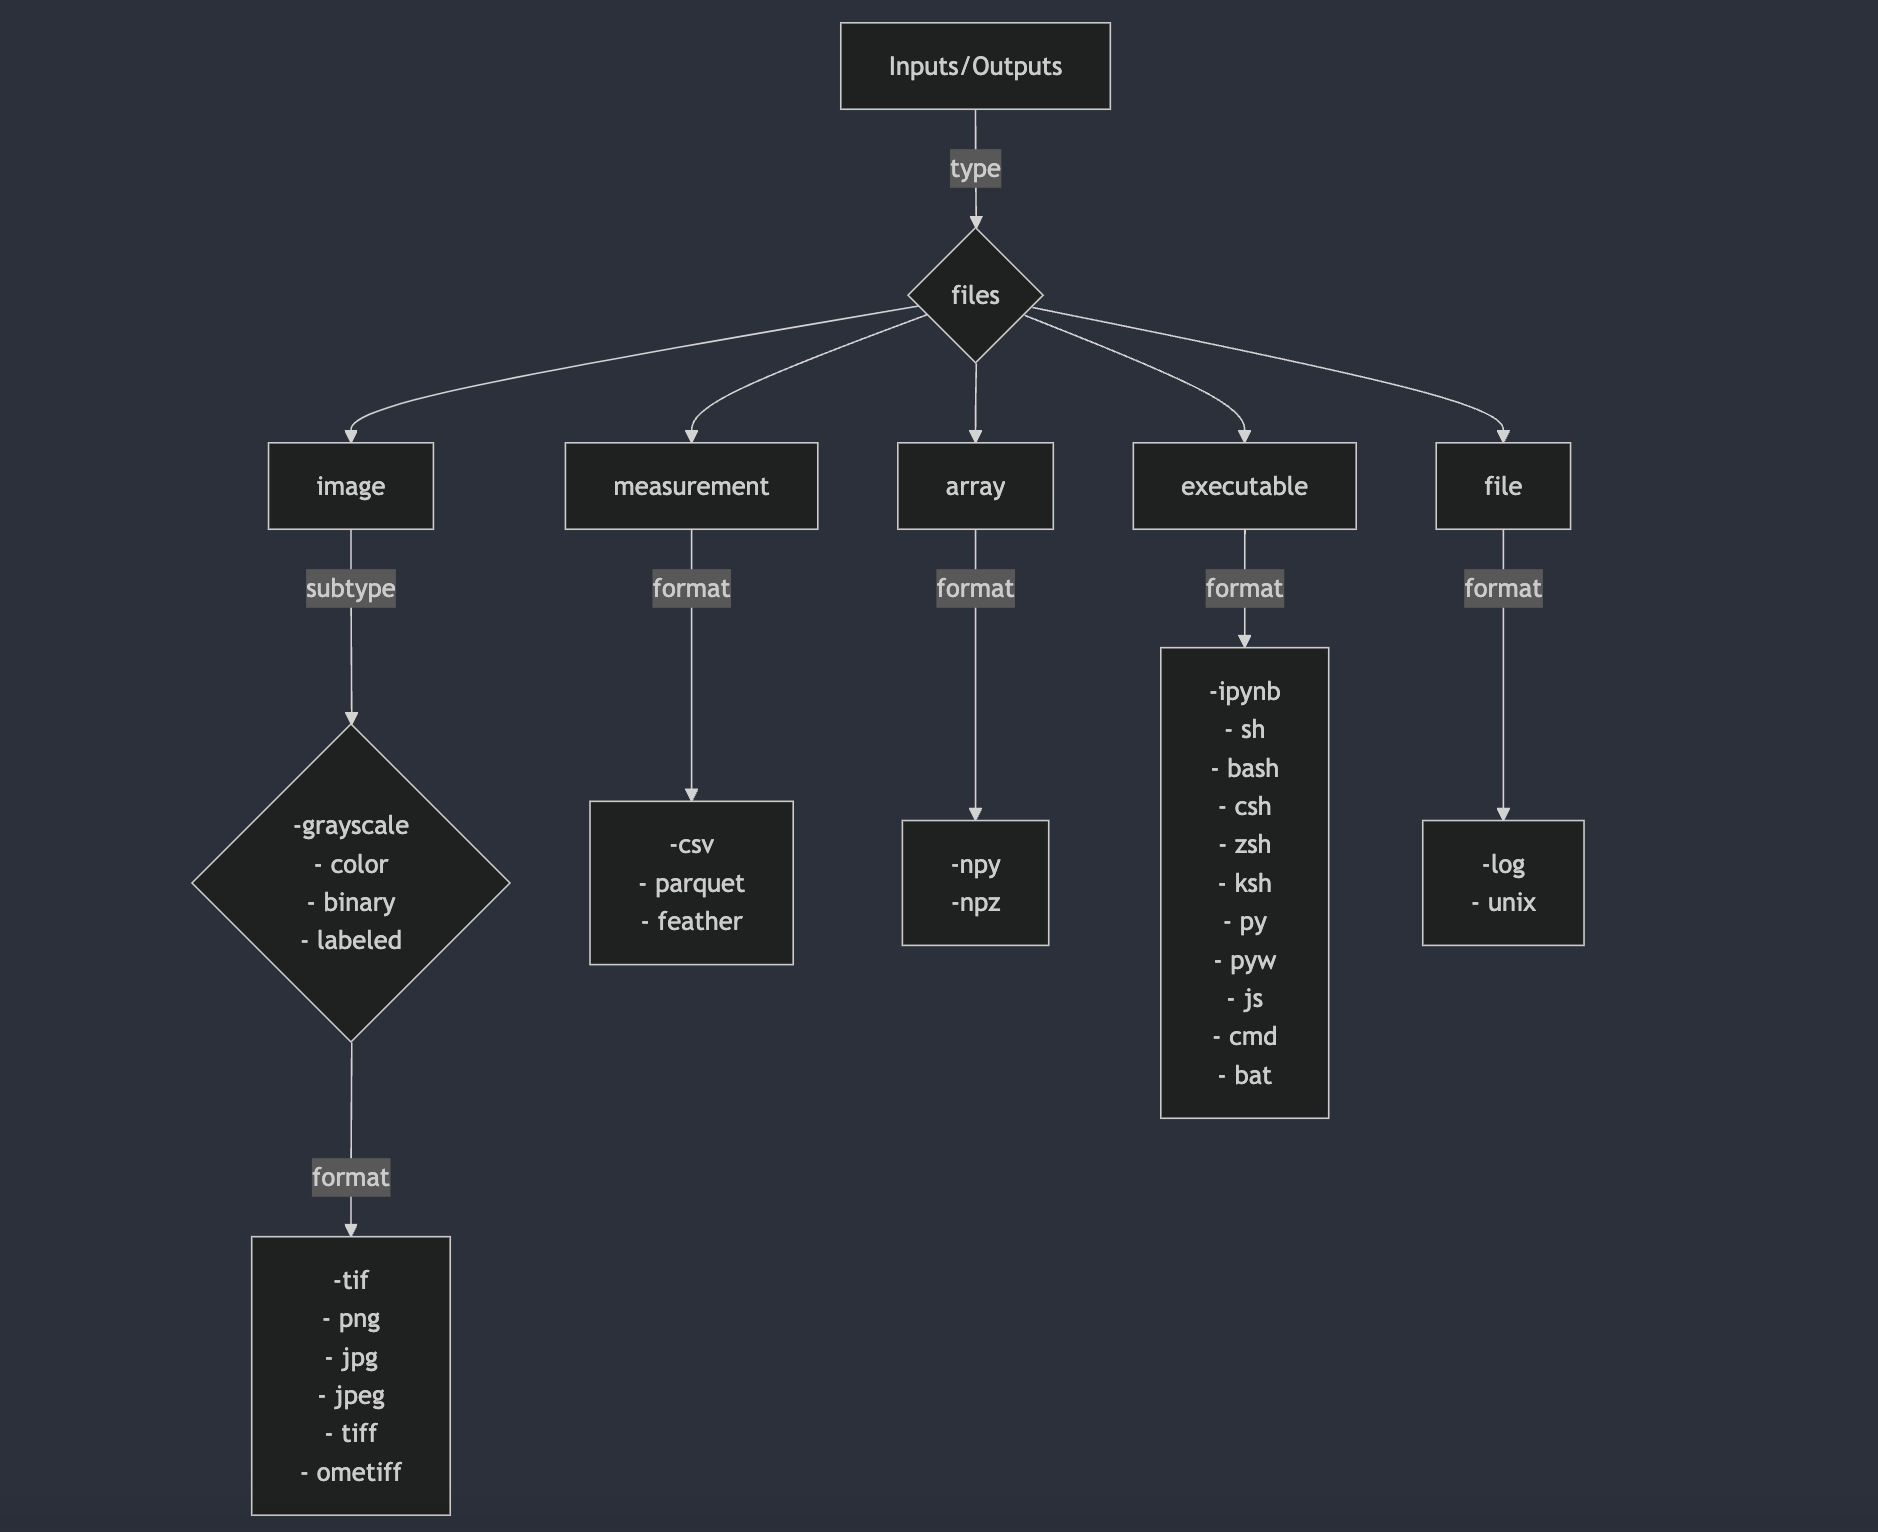
type: image
Skeleton configuration (fill in the values as needed):
- name:
  type: image
  label:
  subtype:
    -
  description:
  cli_tag:
  cli_order:
  default:
  optional:
  format:
    -
  folder_name:
  file_count:
  section_id:
  mode:
  depth:
  timepoints:
  tiled:
  pyramidal:
Input configuration template showing all the accepted values:
- name: input_images
  type: image
  label: "Input Images"
  subtype: # ONLY IFF TYPE==IMAGE. Can list all those relevant subtypes out of these 4, supported by the tool
    - grayscale
    - color
    - binary
    - label
  description: "these are accepted input_images for xyz algorithm"
  cli_tag: "--input_images" # tag to be used in CLI
  cli_order: Integer # default is 0. Could be positive, negative or zero. If negative, then it will be appended at the end of the command. BUT IT IS OPTIONAL TO PROVIDE THIS FLAG.
  default: ("single" | "directory") # if it is a single file or a folder
  optional: (True | False) # if input is optional
  format: # can include all those relevant formats supported by the tool
    - tif
    - png
    - jpg
    - jpeg
    - tiff
    - ometiff
  folder_name: "/path/to/input_images" # folder_path
  file_count: ("single" | "multiple") # if it accepts single file or multiple files. If multiple, then it will be a folder
  section_id: "inputs" # section_id to group the inputs together
  mode: ("beginner" | "advanced")
  # Extra flags ONLY IFF TYPE==IMAGE
  depth: (True | False) # ONLY IF TYPE IS IMAGE. If tool accepts images, with z-dimension i.e. depth, then set it to True
  timepoints: (True | False) # ONLY IF TYPE IS IMAGE. If tool accepts images, with t-dimension i.e. timepoints, then set it to True
  tiled: (True | False) # ONLY IF TYPE IS IMAGE. If tool accepts images, with tiled format, then set it to True
  pyramidal: (True | False) # ONLY IF TYPE IS IMAGE. If tool accepts images, with pyramidal format, then set it to True
type: measurement
Skeleton configuration (fill in the values as needed):
- name:
  type: measurement
  label:
  description:
  cli_tag:
  cli_order:
  default:
  optional:
  format:
    -
  folder_name:
  file_count:
  section_id:
  mode:
Input configuration template showing all the accepted values:
- name: input_measurement # a meaningful name for measurement file(/s) which can be self-explanatory for user
  type: measurement
  label: "Input Measurement" # label would be shown in the UI (only for inputs it matters)
  description: "these are accepted measurement_related_info for xyz algorithm"
  cli_tag: "--input_measurement" # tag to be used in CLI
  cli_order: Integer # default is 0. Could be positive, negative or zero. If negative, then it will be appended at the end of the command. BUT IT IS OPTIONAL TO PROVIDE THIS FLAG.
  default: ("single" | "directory")
  optional: (True | False) # True, if input is optional; False, if input is mandatory
  format: # either or all of those depending on the tool, and if default is directory, or file_count is multiple
    - csv # any csv format files included here eg. csv, tsv etc.
    - parquet # any binary format files included here
    - feather
  folder_name: "/path/to/measurement/files" # folder_path or file_path if single file
  file_count: ("single" | "multiple") # if it accepts single file or multiple files. If multiple, then it will be a folder
  section_id: "inputs"
  mode: ("beginner" | "advanced") # mode just for clean UI, to show objects in segregated sections
type: array
Skeleton configuration (fill in the values as needed):
- name:
  type: array
  label:
  description:
  cli_tag:
  cli_order:
  default:
  optional:
  format:
    -
  folder_name:
  file_count:
  section_id:
  mode:
Input configuration template showing all the accepted values:
- name: input_array # a meaningful name for array(/s) which can be self-explanatory for user
  type: array
  label: "Input Array" # label would be shown in the UI
  description: "these are accepted array for xyz algorithm"
  cli_tag: "--input_array" # tag to be used in CLI
  cli_order: Integer # default is 0. Could be positive, negative or zero. If negative, then it will be appended at the end of the command. BUT IT IS OPTIONAL TO PROVIDE THIS FLAG.
  default: ("single" | "directory") # if it is a single file or a folder
  optional: (True | False) # True, if input is optional; False, if input is mandatory
  format: # either or all of those, depending on default is directory, or file_count is multiple
    - npy
    - npz
  folder_name: "/path/to/array" # folder_path or file_path if single file
  file_count: ("single" | "multiple") # if it accepts single file or multiple files. If multiple, then it will be a folder
  section_id: "inputs"
  mode: ("beginner" | "advanced") # mode just for clean UI, to show objects in segregated sections
type: file
Skeleton configuration (fill in the values as needed):
- name:
  type: file
  label:
  description:
  cli_tag:
  cli_order:
  default:
  optional:
  format:
    -
  folder_name:
  file_count:
  section_id:
  mode:
Input configuration template showing all the accepted values:
- name: input_file
  type: file
  label: "Input File" # label would be shown in the UI
  description: "these are accepted input_files for xyz algorithm"
  cli_tag: "--input_file" # tag to be used in CLI
  cli_order: Integer # default is 0. Could be positive, negative or zero. If negative, then it will be appended at the end of the command. BUT IT IS OPTIONAL TO PROVIDE THIS FLAG.
  default: ("single" | "directory") # if it is a single file or a folder
  optional: (True | False)
  format: # can include all those relevant formats supported by the tool
    - log
    - unix
    - notebook
  folder_name: "/path/to/input_files" # folder_path or file_path if single file
  file_count: ("single" | "multiple") # if it accepts single file or multiple files. If multiple, then it will be a folder
  section_id: "inputs"
  mode: ("beginner" | "advanced")
type: executable
Skeleton configuration (fill in the values as needed):
- name:
  type: executable
  label:
  description:
  cli_tag:
  cli_order:
  default:
  optional:
  format:
    -
  folder_name:
  file_count:
  section_id:
  mode:
Input configuration template showing all the accepted values:
- name: input_executable
  type: executable
  label: "Input Executable" # label would be shown in the UI
  description: "these are accepted input_executables for xyz algorithm"
  cli_tag: "--input_executable" # tag to be used in CLI
  cli_order: Integer # default is 0. Could be positive, negative or zero. If negative, then it will be appended at the end of the command. BUT IT IS OPTIONAL TO PROVIDE THIS FLAG.
  default: ("single" | "directory") # if it is a single file or a folder
  optional: (True | False)
  format: # can include all those relevant formats supported by the tool
    - ipynb
    - sh
    - bash
    - csh
    - zsh
    - ksh
    - py
    - pyw
    - js
    - cmd
    - bat
  folder_name: "/path/to/executable" # folder_path or file_path if single file
  file_count: ("single" | "multiple") # if it accepts single file or multiple files. If multiple, then it will be a folder
  section_id: "inputs"
  mode: ("beginner" | "advanced")
Table 1:Rest of the fields in
inputs,outputs,parametersanddisplay_onlyField Description Applies To labelUser-facing name displayed in the UI (Gradio, Jupyter). inputs, parameters, display_only, outputs descriptionTooltip/help text explaining the purpose of the field. inputs, parameters, display_only, outputs cli_tagCorresponding command-line argument (e.g., --diameter).inputs, parameters, outputs cli_orderDefines the order of this argument in the CLI command. inputs, parameters, outputs defaultPre-set value used if the user does not modify it. inputs, parameters, display_only, outputs optionalTrueorFalse, indicating if the field is mandatory.inputs, parameters, display_only, outputs formatAccepted file formats (e.g., PNG, CSV). inputs, outputs folder_nameInternal container path for storing files. inputs, outputs file_count"single"or"multiple"specifying allowed file uploads.inputs, outputs section_idGroups related UI elements together (e.g., "inputs", "advanced settings"). iinputs, parameters, display_only, outputs modeDefines UI visibility in "beginner" or "advanced" sections. inputs, parameters, display_only, outputs
Defining outputs
name:
type:
label: ""
description: ""
cli_tag:
cli_order:
default:
optional: True
format:
folder_name:
file_count:
section_id: ""
mode: ""
outputs follow same schema as inputs in the spec file.
Defining parameters
Each parameter object has mandatory tags, some of which depend on the parameter type. While the order of tags should generally be maintained, it’s okay if they are slightly rearranged.
name:
type:
label: ""
description: ""
default:
cli_tag: ""
cli_order: 0
optional: True
section_id: ""
mode: ""name: This should be a simple name, ideally matching the
cli_tag(without hyphens). Use underscores instead of spaces. Example:name: use_gputype: This defines how the parameter will appear on the user interface. For example, if you want a Checkbox, the
typeshould be set tocheckbox. Example:type: checkboxBelow is a list of supported types and how they will appear in Gradio or Jupyter Notebook.
Table 2:supported type in config.yaml
type(in config.yaml file) Gradio Jupyter Notebook checkbox Checkbox Checkbox integer Number (decimal values allowed) IntText (allows to put Integer values) float Number (decimal value allowed) FloatText (allows to put Float values) radio Radio RadioButtons dropdown Dropdown Dropdown Details on the
typeTag¶typeis the whole world in itself!With the different
typethere are certain extra flags that you need to put in depending on the value of the flagtype.Table 3:Understanding which extra flags are needed and their purpose
type Extra flag Accepted Values Purpose checkbox append_value True | False Determines how the CLI command is constructed: - If append_value: True: - If user input is True: --cli_tag True - If user input is False: --cli_tag False - If append_value: False: - If user input is True: --cli_tag - If user input is False: No command appended.</td>integer float textbox output_dir_set (This is conditional and used only if output’s folder_path is specified through this flag. Additionally, set the default value to the folder path.) True | False Determines whether the user can modify the folder path: - If True: The user can change the folder path. - If False: The path is fixed and cannot be modified, but the user can still view it. radio options: - label: GRAY value: 0 - label: RED value: 1 - label: GREEN value: 2List of labels and values Each option has a label and value: - label: Displayed on the UI - value: Attached to the cli_tag based on the selected label. dropdown options: - label: GRAY value: 0 - label: RED value: 1 - label: GREEN value: 2List of labels and values Each option has a label and value: - label: Displayed on the UI - value: Attached to the cli_tag based on the selected label. dropdown multiselect False It as of now only supports 1 value to be attached with a cli_tag Also, here’s a collection of templates for each type that you can copy and paste directly into your config.yaml file.
You can find all types of templates listed below:
type: checkbox
-   name:
    type: checkbox
    label: ""
    description: ""
    default: False
    cli_tag: ""
    cli_order: 0
    optional: True
    append_value: False
    section_id: ""
    mode: ""
type: integer
-   name:
    type: integer
    label: ""
    description: ""
    default: 0
    cli_tag: ""
    cli_order: 0
    optional: True
    section_id: ""
    mode: ""
type: float
-   name:
    type: float
    label: ""
    description: ""
    default:
    cli_tag: ""
    cli_order: 0
    optional: True
    section_id: ""
    mode: ""
type: textbox (standard textbox)
-   name:
    type: textbox
    label: ""
    description: ""
    default: ""
    cli_tag: ""
    cli_order: 0
    optional: True
    section_id: ""
    mode: ""
type: textbox (specifying folder path in default)
-   name:
    type: textbox
    label: ""
    description: ""
    output_dir_set: True
    default: "/bilayers/my_folder_name"
    cli_tag: ""
    cli_order: 0
    optional: True
    section_id: ""
    mode:
type: radio
-   name:
    type: radio
    label: ""
    description: ""
    options:
    - label:
      value:
    - label:
      value:
    default:
    cli_tag: ""
    cli_order: 0
    optional: True
    section_id: ""
    mode: ""
type: dropdown
-   name:
    type: dropdown
    label: ""
    description: ""
    options:
    - label:
      value:
    - label:
      value:
    default: True
    multiselect: False
    cli_tag: ""
    cli_order: 0
    optional: True
    section_id: ""
    mode: ""
Defining display_only
display_only functions similarly to parameters, but the key difference is that these objects are only displayed in the user interface and are not appended to the cli_command. They are non-interactive, meaning users cannot modify the values, which will always reflect the default specified in the config.yaml file.
Since they are not part of the cli_command, you can omit cli_tag and cli_order. For the rest of the structure, you can reuse the template from parameters based on the object type.